Add External SRT Subtitles to AVI Video on Mac

You don’t have to be a movie buff to appreciate a good foreign film, but unless you know the language, you will need to watch with subtitles. Or, If your video doesn’t include any subtitles, you can add a .srt file to this video folder, then you will be able to get a video with subtitles by converting to AVI files on Mac. Adding SRT subtitles to your AVI videos can be fairly easy. Here, we will show you an example on how to download External SRT Subtitle or Create Your Own SRT and add an external .srt file to an AVI video. 


Add External SRT Subtitles to AVI Video on Mac


Part 1: Download External SRT Subtitle or Create Your Own SRT before Adding to MP4 Video 

SRT file does not contain any video data, it is a simple text file you can edit by any text editor (translate subtitles into another language). The purpose of srt subtitle file is to use it with desired movie file together to display subtitles when you play video file by any player supporting srt subtitles. As a result, you'll need to add subtitles of your preference while appreciating a foreign movie, unless you know the language. (Related: Top 5 Subtitle Download Sites). 

This part is available for people who do not have any .srt subtitle or who want to add some of their own words to the .srt subtitles displayed onscreen. If you have saved SRT subtitles you need, just skip this part and directly move to part 2. 

Download SRT subtitle: You can put "movie title" + "your preferred language" + "subtitle" as the search strings and select the subtitle file saved in .srt for an effective SRT subtitle file searching. Alternatively, finding the needed subtitle in .srt format from those popular subtitle download sites like Moviesubtitles.org is also a practical way. 

Edit or make your own .srt file: Here we take Notepad as an example. Just open Notepad, create the subtitle you like in the text editor, click menu File->Save As; change the subtitle file name based on your name of video file and save it in .srt format. 

Tips: The SRT subtitle needs to contain the following parts while creating the SRT subtitle: 

1. The number showing which subtitle it is in the sequence. 
2. The time that the subtitle should appear and disappear on the screen. 
3. The subtitle itself. 
4. A blank line indicating the begin of a new subtitle. 


Part 2: How to Add SRT Subtitle to AVI File on Mac 

To load your desired subtitles to any format movie you have, we highly recommended our Pavtube iMedia Converter for Mac (Yosemite 10.10 include). With it, you can add subtitles to AVI video for either saving to a video file to play virtually anywhere. It supports adding all kinds of subtitles to AVI video whatever the subtitle is in .srt, .ass, .ssa, etc. Moreover, It also helps to set the subtitle size, subtitle style, etc according to your preference. Aside from inserting subs to AVI, it also can add watermark/effect/audio track to AVI, trim AVI, crop AVI, and etc. 

The following is a step by step guide on how to add subtitle .srt to AVI video file with the help of iMedia Converter for Mac. If you are on Windows, please get Pavtube Video Converter Ultimate. Here is reason why you choose Pavtube for Add SRT Subtitle to AVI File. 

Hot News!!! - (Now, you can get 50% OFF discount after liked our FaceBook.) More Money Saving Tips, you can ClickSpecial Offer

Step 1. Import AVI video 

Click "Add" button to import the AVI video file which you want to add subtitle .srt or .ass/.saa to. Or simply drag and drop the AVI video into the interface of program. 


Tip: Before loading source video, you need copy .srt file to AVI video folder, rename .srt file according to the video name. And if you add more than one .srt files to the AVI folder, you can rename the .srt file name like this: if source AVI file name is “michael.avi”, the .srt file names can be “michael001”, “michael002”, etc. 

Step 2. Embed subtitles into AVI video 

Click on "Edit" button, the video editor will pop up. Tap "Subtitle" option and check the "Enable" icon. Then, by clicking on "Browse" to import your *.srt, *.ass, *.ssa subtitle file you've downloaded. After the subtitle is loaded, you can preview it. 


Tip: You can change the subtitle size, style, font if necessary. When everything is done, simply click "OK" button. Plus, you can also add watermark, apply effects, and crop, trim your AVI files in the above video editing window. 

Step 3. Set output video format 

To add subs to AVI (to keep the output video as AVI with subtitle), click the "Format" drop-down button to select AVI format from the Common Video profile. 
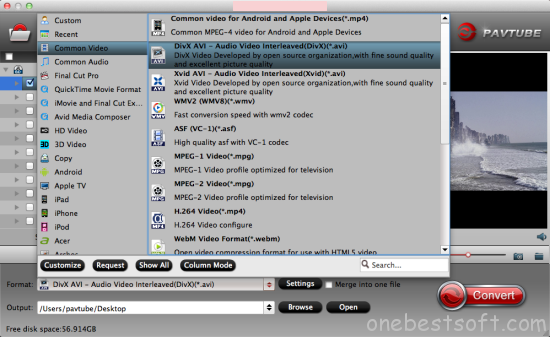
 

Step 4. Finish AVI subtitles merging 

Click the "Convert” button to start adding SRT or ASS, SSA to AVI video, when the conversion is completed, the subtitles file will be embedded into the output AVI video. Now you can play your AVI files with SRT subtitles on Mac at anywhere. 

Note: Once you have merged subtitle text and video into one file, the subtitles would be hard subtitles and become a part of video, in other word, you cannot turn it on or off during playback. 

More 
Play Any Video on 4K Ultra HD TV 
Import Blu-ray to Final Cut Pro with Apple ProRes 422 Format 
Watch MKV/AVI/WMV/VOB/DVD/Blu-ray on iPad/iPhone/iPod via Plex 
Watch MOV files on Samsung TV from USB/Hard drive 
Transfer 1080p/720p HD Videos and Movies to Kindle Fire for playback 
How to Play 3D Blu-ray on Samsung 3D TV via USB? 
Backup Blu-ray/DVD/Videos to iPhone 6S on Win/Mac 

Src 
Add External SRT Subtitles to AVI Video on Mac 


Play Any Video on 4K Ultra HD TV

People who has purchased a 4K TV and is still waiting for the compelling 4K content to arrive may wonder to know the possibility of playing common SD, HD or full HD content on your 4K Ultra HD TV? The answer is depends, like HD TV, 4K TV has limited support for video playback, in addition, the mismatch of file resolution of your video and 4K TV will cause bad video playback quality. Therefore, it is not an easy work to watch any video on 4K UHD TV unless you are an expert in this area. 
Play Any Video on 4K Ultra HD TV


To help user simplify the process of watching common video on 4K UHD TV, Pavtube has upgraded support for TV profile output. Just download Pavtube Video Converter Ultimate/Pavtube iMedia Converter for Mac, you will be able to directly output any video to Samsung/Panasonic/LG/Panasonic TV profile optimized file format with all the suitable profile parameters. In addition, you can also upscale SD, HD and full HD video to 4K UHD with a resolution of 3840*2160 in the output “Profile Settings” window.


Other Download:
- Pavtube old official address: http://www.pavtube.cn/blu-ray-video-converter-ultimate/
- Cnet Download: http://download.cnet.com/Pavtube-Video-Converter-Ultimate/3000-2194_4-75938564.html

Samsung: UN65HU8550F, UN55HU8550F, UN65HU9000F, UN55HU9000F, UN85S9VF, UN65F9000AF, UN55F900AF, UN85S9AFXZA;

Sony: XBR-55X900A, XBR-65X850A, XBR-65X950B, XBR-49X850B, XBR-65X850B, XBR-65X900A, XBR-55X850A, XBR-79X900B, XBR-70X850B, XBR-65X900B, XBR-55X850B, XBR-55X900B, XBR-85X950B, VPL-VW600ES, VPL-VW1100ES;

LG: 84LM9600, 65LA9650, 65LA9700, 55LA9650, 55LA9700, 84LA9800, UB8500, UB9500, UB9800;

How to convert and play any video on Samsung/Sony/Panasonic/LG 4K Ultra TV

Step 1: Add source files to the program.

Start up the program on your computer click “File” > “Add Video/Audio” or “Add from folder” to import source files to the program.


Step 2: Choose TV optimized output file format.

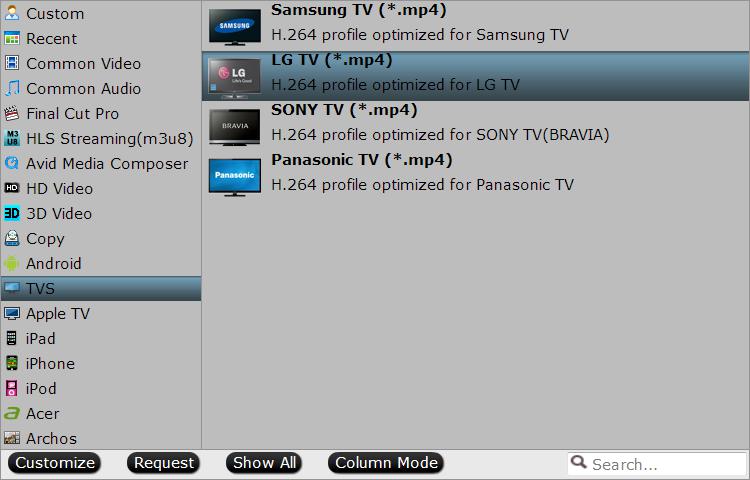
Go to “Format” bar, from its drop-down select, choose TV optimized file format to output according to your 4K TV brands, for example, if you own a LG 4K TV, you can select “TVs” > “LG TV(*mp4)” as your desired output file format.


Step 3: Upscale to 4K resolution.

Click “Settings” icon on the main interface to open “Profile Settings” window, enter “3840*2160” in “Size(pix)” brackets, so that you will be able to upscale your SD or HD content to 4K resolution content for 4K UHD TV.


Step 4: Start Video to UHD TV conversion process.

After all the setting is completed, hit the "Convert" button under video previewing window to start the video conversion process.

When the conversion is completed, you will be able to watch more sharper and detailed videos and movies on 4K Ultra HD TV.


More

Play 4K UHD Videos on 4K HD TV for 4K HD Experience
Import Blu-ray to Final Cut Pro with Apple ProRes 422 Format
Watch MKV/AVI/WMV/VOB/DVD/Blu-ray on iPad/iPhone/iPod via Plex
Watch MOV files on Samsung TV from USB/Hard drive
Transfer 1080p/720p HD Videos and Movies to Kindle Fire for playback
How to Play 3D Blu-ray on Samsung 3D TV via USB?
Backup Blu-ray/DVD/Videos to iPhone 6S on Win/Mac 


Src
Play Any Video on 4K Ultra HD TV -Best Video Solution

Play 4K UHD Videos on 4K HD TV for 4K HD Experience

4K Ultra HD provides new standard of high definition, and undoubtedly be the future of TV resolution. Technically, 4K refers to the 4096×2160 Digital Cinema resolution, whereas 3840×2160 should be classed as Ultra HD, but the term “4K” is just so much catchier. Do you have some 4K videos recorded by camcorders or downloaded from online websites? Maybe you have, after got the 4K videos, you may want to watch 4K videos on HDTVs, like 4K TVs or smart TVs, is it easy to play 4K files on 4K HD TV? 


The answer may be disappointed, because most TVs on the market can’t play 4K files smoothly, besides, 4K videos usually in special video format, such as MXF, as we know most HDTV can’t play all the HD video formats, the supported video formats are limited, so you will meet with video compatibility issue when you play 4K files on 4K HD TV.

How to enjoy any videos on 4K TV? Don’t worry. From LG LED/Smart/4K TV official product page you will learn that 4KTV only supports MP4 video format from USB flash drive, if you have videos or movies in other video formats like MKV, AVI, WMV, FLV, MOV, MP4, MTS, VOB, M2TS, AVCHD, etc. In that case, a third-party 4K TV Converter is needed. Here, Pavtube Video Converter Ultimate to solve the problem. Here is review.

Now, Just download the Ultra 4K HD TV Converter and follow the steps below to perform the conversion. For Mac users, you can turn to Pavtube iMedia Converter for Mac.

Free download this Top 4K TV Converter for Windows or Mac, then just follow the 4 steps to complete the all kinds of movies to 4K TV suitable formats conversion.


Other Download:

- Pavtube old official address: http://www.pavtube.cn/blu-ray-video-converter-ultimate/
- Cnet Download: http://download.cnet.com/Pavtube-Video-Converter-Ultimate/3000-2194_4-75938564.html

Step 1: Add all kinds of 4K movie files to the top 4K TV Converter


Step 2: Define output file format. Click "Format" bar, from its drop-down option list, you can select "TVs" profile. Here, it has optimized MP4 format for 4K TV.


Step 3: Set video parameters. When 4K Ultra HD TV plays videos via USB, it will not support 4K resolution. If your Blu-ray/DVD, MKV, AVI, WMV videos etc is 4K, you need to downscale 4K to 1080p video in “Settings”.


Step 4: Start converting your favorite movies to 4K TV.

Now, you can easily create a true cinema experience at home, so you can enjoy sharper, more detailed images and any movies than ever before.


More

Import Blu-ray to Final Cut Pro with Apple ProRes 422 Format
Watch MKV/AVI/WMV/VOB/DVD/Blu-ray on iPad/iPhone/iPod via Plex
Watch MOV files on Samsung TV from USB/Hard drive
Transfer 1080p/720p HD Videos and Movies to Kindle Fire for playback
How to Play 3D Blu-ray on Samsung 3D TV via USB?
Backup Blu-ray/DVD/Videos to iPhone 6S on Win/Mac 
Remove DRM and Download Digital Copy to Surface 3

Src
Play 4K UHD Videos on 4K HD TV for 4K HD Experience


Import Blu-ray to Final Cut Pro with Apple ProRes 422 Format

Q: “Recently, my friend bought me a great movie which called "The King’s Speech". I have purchased many Blu-ray movies in the past several years, now I need to use some clips of the Blu-ray movies in Final Cut Pro with my recordings, can you tell me the best way to rip Blu-ray and edit with FCP X? What software do I need? Thanks!” 

Just as showed above, you may want to import Blu-ray to Final Cut Pro for editing. However, the Final Cut Pro only accepts DV, HDV, P2 MXF (DVCProHD), XDCAM, and 2K film formats and does not support Blu-ray importing. So, you will need to convert Blu-ray to FCP X supported format. Is there an easy way to convert Blu-ray HD contents into your own film? Now, You got the right place! Pavtube BDMagic for Mac can help you, With it, you can rip/convert Blu-ray movies to Apple ProRes 422 (Review: Types of Apple ProRes Codecs)for FCP without quality loss in a fast speed on your Mac OS X (El Capitan included). Below is how.

Why choose Pavtube BDMagic for Mac? Here is a customer review:

“I use the program to allow me to edit clips in FCP X. I like to use Final Cut Pro X (10.1.3) from Apple because it’s really intuitive and fast. I find that I’m able to translate my editing ideas from initial thought to realization quickly and easily. Pavtube is just one of the best tool that allows me to pull in content from Blu-ray to help my clients realize their vision.”

Step-by-Step Guide: Rip/Convert Blu-ray to ProRes 422 for editing on FCP with Pavtube Blu-ray to FCP Converter.


Other Download:

- Pavtube old official address: http://www.pavtube.cn/blu-ray-ripper-mac/
- Cnet Download: http://download.cnet.com/Pavtube-BDMagic/3000-7970_4-76177782.html

Note: For Ripping Blu-ray to FCP on Mac, a Mac compatible BD driver is needed.

Step 1. Load Blu-ray movie.

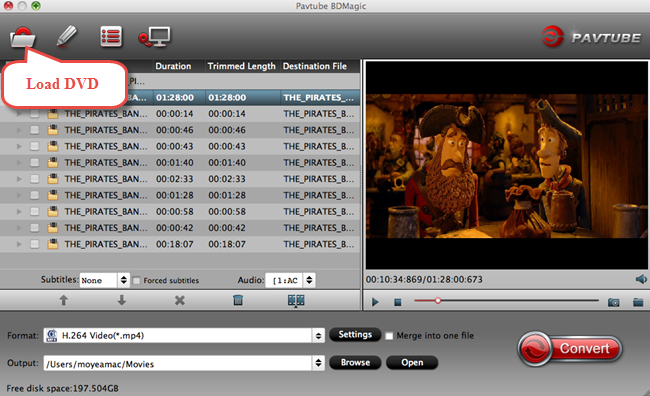
Install and run the Blu-ray to ProRes Converter for Mac, click "Add Disc" icon to add source Blu-ray/DVD Disc from disc driver. Or load from BD/DVD folder or IFO/ISO file.


Tip: This Blu-ray to FCP Converter not only can help you convert Blu-ray to FCP, but also enables anyone with Blu-ray files to use in any non-linear editor like Adobe Premiere ProiMovie, FCE, Avid Media Composer, etc as long as rip Blu-ray to a recognizable format.

Step 2. Choose output format.

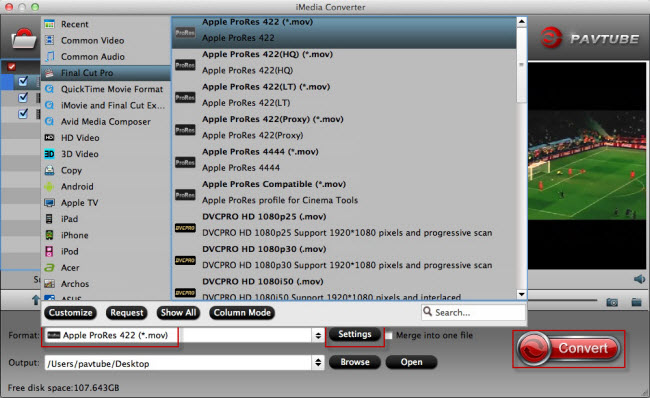
Click the Format button, and choose "Final Cut Pro > Apple ProRes 422 (*.mov)" as best codec for FCP.


Tip: Click on "Settings" button to adjust audio and video parameters. Bit rate, aspect ratio, frame rate, sample rate, and channels are all changeable in the following interface, so you can adjust them according to your own requirements.

Step 3. Convert Blu-ray to prores for FCP editing.

Click the “Convert “button to start conver blu-ray to Prores Converter for FCP under Mac. Click “Open” button to get the exported files for transferring to FCP with easy playback or editing.

What’s more? if you prefer to work with multiple audio tracks, another Pavtube ByteCopy for Mac can do this for you, it supports to preserve multiple audio and subtitle streams and leave out unwanted ones, retain chapter information, allow editing videos, etc.


More
Watch MKV/AVI/WMV/VOB/DVD/Blu-ray on iPad/iPhone/iPod via Plex
Watch MOV files on Samsung TV from USB/Hard drive
Share my way to rip BD/DVD to MP4 on Mac for my iPad, Apple TV, PS 3, Xbox 360, Roku and other players
Mac Solution: Transfer 1080p/720p HD Videos and Movies to Kindle Fire for playback
How to Play 3D Blu-ray on Samsung 3D TV via USB?
Backup Blu-ray/DVD/Videos to iPhone 6S on Win/Mac 
Remove DRM and Download Digital Copy to Surface 3
Top 5 Blu-ray Ripping Programs Review 2015

Src
Import Blu-ray to Final Cut Pro with Apple ProRes 422 Format


Travel to Mobile World Congress 2016 - What You Need to learn

Which mobile devices can you expect from Mobile World Congress 2016? What issues will you meet when playing movies on theses mobile devices? 

Mobile World Congress is the largest mobile trade show of the year. It occurs at the end of February each year. 2016 event will begin Monday, 22 February and continue through Thursday, 25 February. Now, let’s travel to MWC 2016 and to learn everything you need to know. 


MWC makes people excited for they are expecting to see some of the year's biggest smartphones to be unveiled at the show. Here's everything we're expecting to see at MWC 2016. 

Galaxy S7 and S7 Edge 
HTC One M10 
Sony Xperia Z5 and Z6 
Huawei Mate 8 
Blackberry Priv 
Xiaomi Mi5 
LG G5 
Microsoft Lumia 650 
Samsung Gear 360 
Samsung Gear S2 
Moto 360 (2nd generation) 
Asus ZenWatch 2 
Huawei Watch 

The reason that Mobile phones and tablets become essential is that we don’t just call others with them, we browse the web, show ourselves with social softwares, and watch movies with mobile phone, tablet, VR Headsets. However, for the format limitation, resolution requirement and other reasons, we often meet playback issues on these mobile devices. Here. Let’s see some tips and media solutions for MWC 2016 Mobile hardware. 


Phone and Tablets Media Solutions 

Samsung Galaxy S7/S7 Edge Supported Formats 

Transfer Music Video to Galaxy S7/S7 Edge 

Sony Xperia Z5/Z6 Supported Formats 

Watch Blu-ray/DVD/HD/SD video on Xperia Z5 

Play Any Video on Blackberry Priv 

Transfer Blackberry 10 Content to Blackberry Priv 

Play MKV, FLV, Tivo, VOB, MXF, AVCHD on LG G5 

Play and Transfer MKV, FLV, VOB on HTC One M10 

Transfer and Play Any Video/Audio on Xiaomi Mi5 


Virtual Reality Headsets FAQ 

Setup Gear VR to Watch Movies 

YouTube offer 360-Degree Videos for Gear VR 

Format Supported by Gear VR Software 

5 Best 3D movies to watch on Gear VR 

Watch 3D movies with Samsung Gear VR 

Watch 3D Blu-ray on Galaxy S6/S6 Edge via Gear VR 

Backup DVD to Galaxy S6/S6 Edge in Gear VR Innovator Edition 

Solution of Issue about DVD Playback in TV with Gear VR + Chromecast 

Play 3D Blu-ray via Galaxy Note 4 in Gear VR 

Rip Blu-ray to SD card on Oculus Cinema use Smartphone and Gear VR 

Rip 3D Blu-ray to 3D SBS MKV to Watch in Samsung Gear VR Unit 

Remove iTunes DRM and make SBS 3D to Gear VR with Galaxy Note 4 

Play Digital Copy in Galaxy S6 with Gear VR Innovator Edition 

Create compatible 3D SBS video from your own 3D movie for Gear VR 

No Sound when I Play MKV movie with AC3 on Gear VR? 

Rip 3D Blu-ray ISO files to Samsung Gear VR using XBMC 

Watch 3D YIFY movies on Samsung Gear VR via Mac Yosemite 

Rip ISO files to 3D SBS MP4/MKV for viewing on Gear VR 

Make Plex to stream a DVD for watching on my virtual reality Gear VR 

Enjoy ISO movies to MicroSD for Gear VR (Innovator Edition) 

How to Watch GoPro Hero 4 3D Video with Gear VR? 

3D Blu-ray to 3D SBS for Samsung Gear VR 

Watch Digital Copy with Gear VR Innovator Edition 

Remove iTunes DRM for Gear VR with Galaxy Note 4 

How to Play All 3D Movies on the New Gear VR? 


Other Tips 

Full list and Reviews for 2016 Best New Phones 

Samsung Galaxy S7 VS HTC One M10 

When enjoy movies on phone and tablets or VR devices, how can you miss the Oscars 2016 Nominations Best Movies? You will be glad to enjoy The Walk on Gear VR or watch The Revenant with Plex on TV/PC/Tablet. Of course, The Martian, Brooklyn, Spotlight can’t be missed, neither. 

If you are interested in playing any Oscars 2016 Nominations movies on mobile devices, just visit the 88th Academy Award Ceremony columns. 

Source: http://best-tablet-converter.com/mobile-world-congress-2016/

Share my way to rip BD/DVD to MP4 on Mac for my iPad, Apple TV, PS 3, Xbox 360, Roku and other players

If you like to get my Blu-ray and DVD discs for viewing on computer or other devices, all you need is a bit of hardware and software to make it all possible. Here is my test for ripping my movies and I wanna share to all of you guys here. 

I like collecting Blu-ray and DVD movies and what I find most wonderful is to take my BD/DVD discs for viewing on-the-go or when sitting at work writing code. Besides, I owned one Blu-ray player in the house, but I'm annoyed by one unskippable warning or commercial after another as below.

As we know, commercial pre-recorded DVD and Blu-ray discs are typically protected with some form of copy protection. In the US, a controversial law called the Digital Millennium Copyright Act (DMCA) has criminalized any attempt to decrypt protected content, even if the consumer has legally purchased the content.

And because of this, I choose to exercise my fair-use right to format-shift my movies into something more convenient. Making a personal backup of movies you own is in a legal gray-area in the U.S. The encryption is where the line is drawn. You’ve been warned!

Hardware

The Mac used for this tutorial is an 17″ MacBook Pro (early-2011) with a 64-bit quad-core 2.2 GHz Intel Core i7 processor, 16 GB of RAM, OS X Mountain Lion, and a standard, built-in Superdrive. The external BD-R drive is a Buffalo MediaStation 6X USB 2.0 Portable Blu-Ray Writer.

Backing-up your discs

Pretty much every Mac since the early 2000s has shipped with a DVD drive, so these are easy to come by. For backing up personal DVDs so that they can be format-shifted, here Pavtube DVDAid for Mac is highly recommended. A license is a paltry $21 now. It is a professional Mac DVD ripping tool with strong ability to remove DVD protection and transcode DVD to any video and audio format for using.


Main features:
  • Best DVD ripping software on the market
  • Rip and convert DVD movies to MP4/AVI/MKV/WMV,etc with high quality.
  • Makes 1:1 copy of original DVD Disc without quality loss with all audio streams, subtitle tracks, extras, etc.
  • It’s simple to use and well worth the investment.
  • Support latest DVD
  • Support adding *.srt and *.ass subtitle
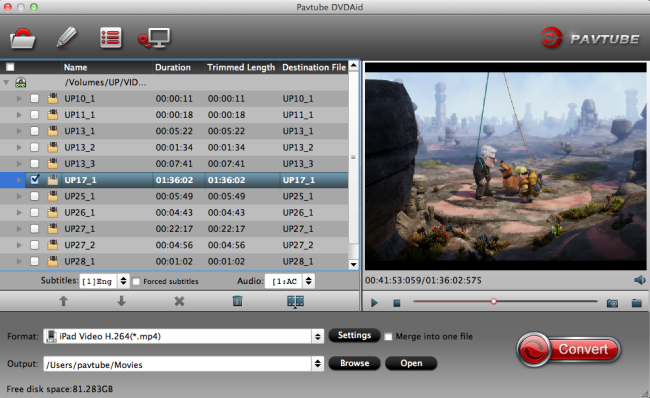
Backing up is as easy as A, B,C, you just need to inserting the DVD, launching DVDAid, choosing format, and clicking "Convert". You can expect a rip to take 1-2 hours, depending on the size of the disc.

Someone will try RipIt, but I think it is a little expensive, and this program does not work if you are now using Mac 10.9 Mavericks, so I think it is not recommended according to my experience.

Read the detailed info: Alternative to RipIt for Mac to Rip DVD on Mac 10.9 Mavericks


For Blu-ray discs, you first need a Blu-ray drive. For backing up personal Blu-rays so that they can be format-shifted, Pavtube ByteCopy for Mac is highly recommended. A license is $29.4 now. It can rip commercial Blu-ray and DVD movies to MKV container format with multiple audio tracks and subtitles included. Besides Pavtube ByteCopy for Mac is also able to encode my BD/DVD for playback on PC and HD media player.


Main features:
  • Automatically detect Blu-ray/DVD main movie
  • Full disc copy Blu-ray/DVD by chapters without quality loss
  • Rip/convert/backup BD/DVD to any other format for playback on any iOS/Android/Windows tablets and phones
  • Backup BD/DVD to MKV format with multi audio/subtitle tracks and chapter markers without any quality loss.
  • Convert BD/DVD to MP4/MOV with multi audio (language) tracks
  • Add SRT, ASS, and SSA subtitles to BD/DVD movie
  • Edit BD/DVD movies: trim off commercials, crop off black bars, merge several chapters into one, split one movie into several pieces, and more
  • Support latest BD and DVD
I didn't choose MakeMKV as it only makes.mkv files and a license is somewhere in the $60-$80 range, too expensive for me.

Reviews: ByteCopy for Mac- Top Alternative to Mac MakeMKV on Mac OS X


Backing up is as simple as inserting the Blu-ray disc, launching ByteCopy, and choosing "Lossless/encoded Multi-track MKV(*.mkv)” and click "Convert". You can expect a rip to take 45m-1h15m, depending on the size of the disc.

If you’re on Windows, check-out DVDAid and ByteCopy.

Format-Shifting to MP4/H.264/AAC

Video files are a lot more complicated than most people realize. You may have heard words like MKV, MPEG-4, AVI, MP3, AAC and other acronyms.

The short explanation is that every video file is made up of 3 different parts: the video stream, the audio stream, and the container. The audio and video are synced-up (a.k.a., “multiplexed” or “muxed”) and are bundled together into a single file using a container format.

If you want to make yourself a little more educated about this stuff, check out the “Video on the Web” chapter of Dive Into HTML5 by Mark Pilgrim. For this exercise, just know that we want to end up with an H.264 video stream and an AAC audio stream, wrapped up inside anMP4 container.
For this, we’ll use Pavtube BDMagic for Mac. A license is $39.2 now. It can copy Blu-ray and DVD with original structure, and convert 2D/3D Blu-rays and standard DVDs to watchable video/audio format for mobile devices.

Main features:
  • Rip Blu-ray 3D/2D discs to MP4, AVI, MKV, MOV, WMV, etc. without video-audio sync issues
  • Directly copy the latest releases of Blu-ray/DVD movies in fast speed
  • The broad support of multimedia devices, such as Apple iDevice, Android devices, Windows devices, PSP, PS3, Xbox 360, etc.
  • Convert Blu-ray for editing on Mac.
  • Add *.srt, *.ass, or *.ssa subtitle files to BD/DVD movie or videos
  • Customize video/audio parameters, resize video screen, rip files in batches, etc.
  • Edit video by trimming, cropping, merging, adding video effects and audio editor
The freeware like Handbrake can only deal with the non-protected Blu-ray movies. Also even some paid Blu-ray ripping programs can't successfully finish this task. So I didn't select. 
Get the Best Handbrake Equivalent for Win/Mac(OS X Mavericks included)

Pavtube BDMagic for Mac will take our personal backups as input, and produce an.mp4 (or .m4v or other files — same thing) as output for watching.

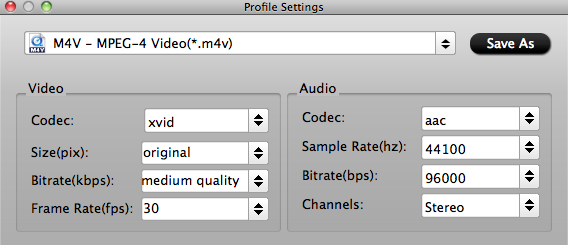
BDMagic for Mac comes with a good set of default settings. If you don’t know what you’re doing, feel free to use those. I’ve tweaked my settings a bit as I prefer higher-quality files at the cost of a larger file size.

See the following screenshots for information on my presets.


The biggest difference between these is that the video bitrate for DVDs is 3,000 kbps while for Blu-rays it’s 10,000 kbps.

If you’re using my presets, choose DVD (480p) if your source is a DVD backup, or Blu-ray (1080p) if your source is a Blu-ray backup. It may also be helpful to check out the BDMagic for Mac Quick-Start Guide if you’re new to the tool.

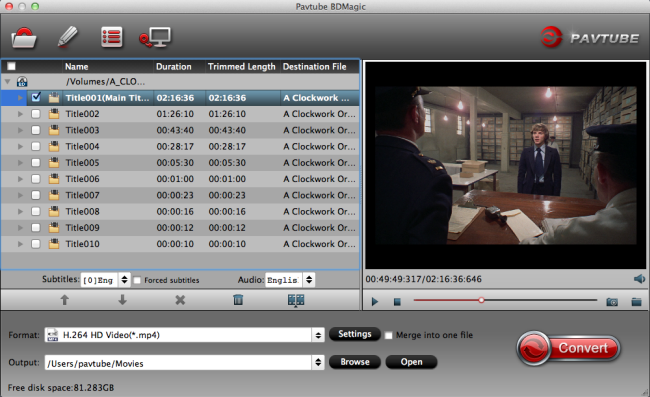
Click the "Load disc" button. Once you’ve queued-up all of the movies you want to format-shift, click the "Convert" button. On the reference hardware listed above, DVDs typically take 45m-1h30m to fully encode a new MP4 file. Blu-rays take 4-6 hours. In both cases, Pavtube BDMgaic for Mac will leverage as much of your CPU and RAM as possible, so don’t expect to be able to do much with your computer until its done.

There is a box of video “Bitrate” on the Profile panel, which is related to file size and quality. By default “medium quality” is applied, which means a Blu-ray of 20GB will be downsized to 8-9GB, and the picture quality is great on PC and HDTV. When “high quality” is set, the file size is doubled, and video quality will be improved (unnoticeably on PC). When “low quality” is set, the file size will be cut down to around 3GB, and you get videos of DVD quality.If having a 15-20 GB copy of Robocop 2014 is too much, lower the video bitrate for the Blu-ray (1080p) setting from 10,000 kbps. The lower the setting, the worse the quality, but the smaller the file size.

One more tip: 1080p video has a resolution of 1920×1080. The smaller the screen, the less there is for your eyes to notice, so you can be more forgiving of lower-quality. However, if you’re stretching1920×1080 across your nice new 55″ LED TV, a low-quality file will make your whole movie-watching experience suck. The bigger the TV, the better you want the quality to be.

Metadata and Artwork

Once you have your .mp4 or .m4v file, you’ll want to give it a proper name and add the metadata and artwork to the file. The format I use is ().mp4 (e.g.,My Favorite Movie (1080p).mp4).

It’s possible that you may have heard of AtomicParsley, MetaX or MetaZ before. They all suck. Check out Subler instead.


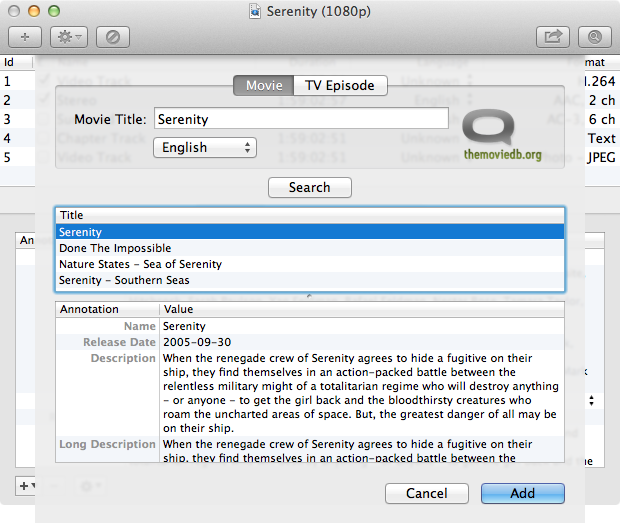
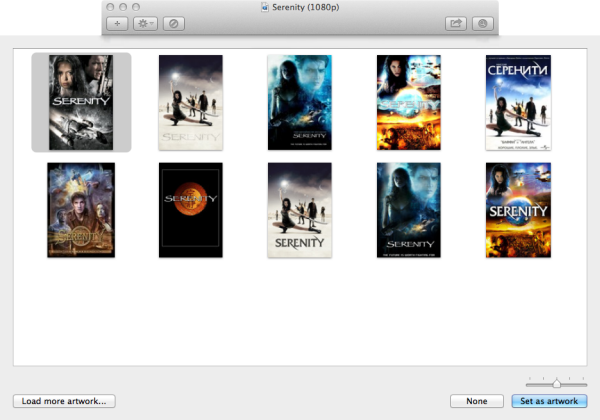
Subler queries The Movie DB for movie data and artwork, and uses TVDB for TV show data. While The Movie DB has a pretty awesome selection of movie artwork, I’m generally unimpressed with the TV show artwork. For that, I use Get Video Artwork and download the iTunes-compatible, square-shaped TV show artwork.


Save your changes, and Subler will write the video metadata and artwork into the file.

Streaming via iTunes

I have an Xbox 360, a Playstation 3, and two Apple TVs at home. I also have an iPad 2, iPad 3 and an iPad mini. Needless to say, I watch a lot of movies and TV shows.

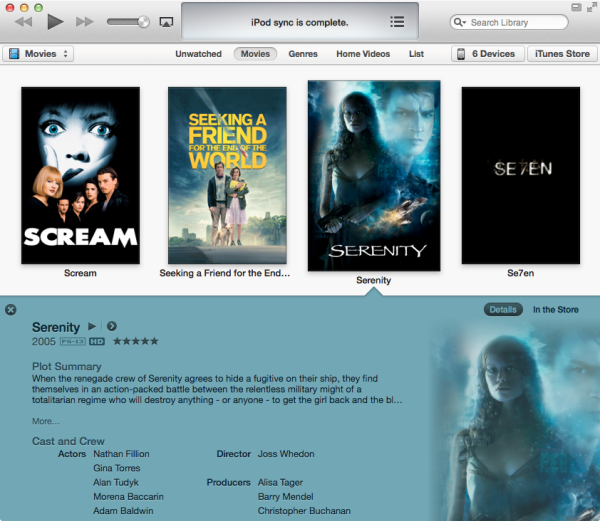
Because the video files tend to be so large, I use an external hard drive attached to my Mac to store the video files. I then tell iTunes where to find the movie by option-dragging the MP4 file from Finder into iTunes’ Movie pane. The option-drag tells iTunes “here’s a pointer to the movie, but don’t copy it onto my built-in hard drive”.


Now it’s time to watch your movie!

My iPad supports 1080p video. Simply sync the movie to your iPad and watch it on-the-go.

As long as your computer running iTunes and your Apple TV are on the same network and are both configured to use the same Home Sharing account, you should be able to start streaming the movie to your Apple TV right away. (I would always recommend a hard-wired network connection, otherwise a Wireless-N connection. A Wireless-G connection is likely going to require more buffering or have choppy playback.)

To stream to your Playstation 3, you’ll need to be running a DLNA server on your Mac.Medialink ($20) can be installed as a System Preference and automatically serve your iTunes content to your Playstation 3.

To stream to your Xbox 360, you’ll need to be running a similar server which the Xbox understands. Connect360 ($20) can be installed as a System Preference and automatically serve your iTunes content to your Xbox 360.

Since MP4/H.264/AAC is the industry-wide standard for all modern-age video, pretty much any smartphone, tablet, laptop, operating system, and streaming device created since 2004 can play this format out-of-the-box. Even ancient OS’s like Windows XP have been updated to support this format. Go nuts.

Isn’t it quite easy? Just several mouse clicks, you have finished Blu-ray backup or ripping and obtained the wanted .mp4/.m4v files. Now time for enjoy!

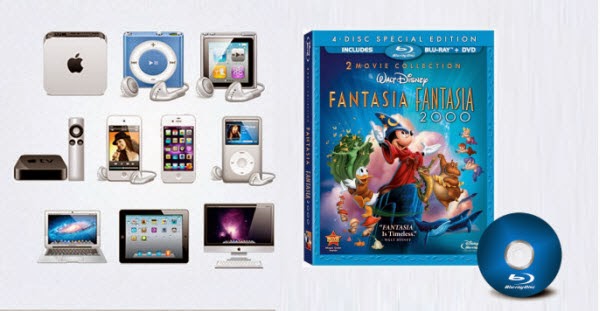
Blu-ray Disc (also known as Blu-ray or BD) is an optical disc storage medium designed to supersede the standard DVD format. Its main uses are for storing high-definition video, PlayStation 3 games, and other data, with up to 25 GB per single layered, and 50 GB per dual layered disc. The disc has the same physical dimensions as standard DVDs and CDs.

Meanwhile, with Pavtube's new site releasing, there are many new Money Saving Software Bundles like:

ByteCopy($42) + Video Converter Ultimate($65) = Only $79.9, Save $27.1
ByteCopy($42) + DVD Creater($35) = Only $44.9, Save $32.1
ByteCopy($42) + Vidpie($29) = Only $54.9, Save $16.1
ByteCopy($42) + MXF MultiMixer($45) = Only $69.9, Save $16.1
Video Converter Ultimate($65) + Vidpie($29) = Only $74.9, Save $19.1
Video Converter Ultimate($65) + DVD Creater($35) = Only $64.9, Save $35.1
BDMagic($49) + Vidpie($29) = Only $49.9, Save $28.1
BDMagic($49) + DVD Creator($35) = Only $49.9, Save $28.1
DVDAid($35) + Vidpie($29) = Only $49.9, Save $14.1
DVDAid($35) + DVD Creator($35) = Only $35.9, Save $34.1

Go to find the one you need.


More

Stream DVD and Blu-ray collection to Apple TV with Plex Channel
How To Upload 4K Video To YouTube With Suitable Format And Parameters?
Watch Christmas 3D Movies on Homido VR via Samsung Galaxy Series
Play Blu-ray with multi-track MP4 on Apple Devices (iPad, iPhone, iPod & Apple TV)
Make 3D Blu-ray available on 3D television via your PS3
Remove DRM and Download Digital Copy to Surface 3
Quickly Stream MKV files to Roku 3 for playing via USB

Src
Testing: Share my way to rip BD/DVD to MP4 on Mac for my 

Play Blu-ray with multi-track MP4 on Apple Devices (iPad, iPhone, iPod & Apple TV)

This article tell you how to watch Blu-ray movies on Apple Devices (iPad, iPhone, iPod & Apple TV) in multi-track MP4 format so you can switch to the desired language during playback.Apple Devices, like iPad, iPhone, iPod & Apple TV are becoming more and more popular, according to CNBC's All-America Economic survey, the Apple- buying household on average has a total of three Apple products. Overall, the average household has 1.6 Apple devices with almost one quarter planning to buy at least one more in the next year. 


Perhaps you have many rental Blu-ray movies and was planning to watch it for enjoyment on your new Apple device. And you are so busy that you have no time to watch it. Returning date is coming soon. Then you may have the question as below: 

Anyone know a way to make it possible to watch the blu-ray movie on my iPad or iPhone? Becides, I want to keep the multi-tracks of the movies, then I can enjoy it with any language by switching to the desired one. 

Have you meet the same problem? To stream the blu-rays movies to your Apple device for watching without time limitantion with multiple language, you need to rip blu-ray to iPad, iPhone, iPod & Apple TV compatible mp4 format as well as multiple audio tracks saved. Below is a brief guide for you to play Blu-ray with multi-track MP4 on Apple Devices (iPad, iPhone, iPod & Apple TV). 

Required Software: 

This top Blu-ray/DVD backup and coping tool can rip Blu-ray movies and DVDs to MP4 container format with multiple audio tracks and subtitles included. It could also convert Blu-ray/DVD to any video format you like. Moreover, you can edit movie by trimming, cropping, merging, etc and support adding *.srt and *.ass subtitles to BD/DVD movies. 

Step by step guide to convert Blu-ray to multi-track MP4 on Apple Devices (iPad, iPhone, iPod & Apple TV) 

PS: 

This application can work on Windows XP/2003/Vista/Windows 7/Windows 8/Windows 8.1. 

The Mac version work on Mac OS X 10.5 or 10.5 above (including Mac OS X Leopard, Snow Leopard, Mac OS X Mountain Lion, Mavericks 10.9) with 1G Hz or above Intel processor. 

Step 1: Install the Blu-ray Ripper for Apple device, then load your rental blu-ray movies to the program. 

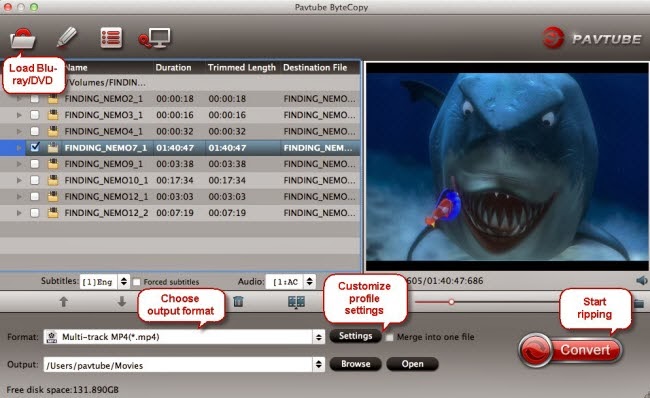
Step 2: If you want to watch your rental blu-ray movies with multi-tracks, click the "Format" bar and choose the "Multi-track MP4(*.mp4)" format under "Multi-track Video" option which is designed for keeping multiple audio tracks. 

Step 3: Click on "Settings" to modify video codec, resolution, frame rate, sample rate etc. Of course, different settings will have different results. And you should know, the higher video quality with bigger video size, please pay attention to your storage. You can change these settings according to your own devices. 

Step 4: Start ripping rental Blu-ray movies to Apple device by clicking on the "Convert" button. 

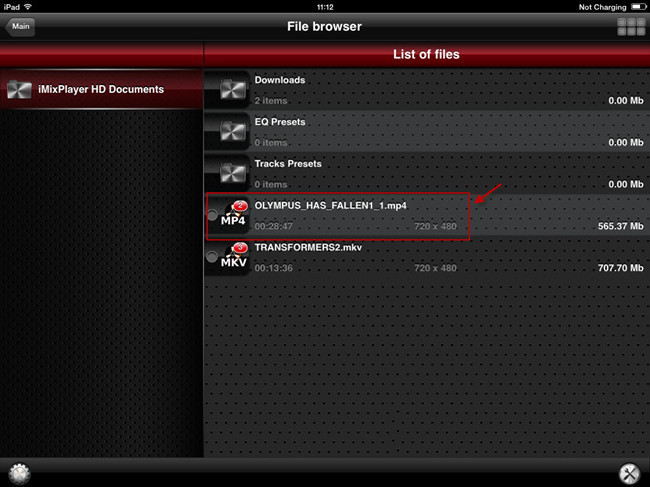
Once the conversion completed, transfer the result MP4 video file to your iPad, iPhone, iPod & Apple TV where you want to enjoy it. 

How to Install multi-track player and watch multi-track video on Apple Devices 

1. Type in the keyword “multitrack player” in Apple Store, many free or charged apps would show up, choose one and install it. 


2. Open iTunes, and add created multi-track MP4 movie to this multi-track player. 


3. Open this multi-track player, open the source multi-track MP4, and choose wanted language during movie playback. 


Related articles: 

Play multi-channel MP4 file on iOS devices 
Converting DVD ISO/IFO files to Multi-track MP4 for iPad Air 
Transcode MXF to MKV with multiple audio tracks preserved 
Convert multi-audio tracks MXF to MP4 on Windows or Mac 

Get more money-saving tip: 
ByteCopy($42) + Video Converter Ultimate($65) = Only $79.9, Save $27.1 
ByteCopy($42) + DVD Creater($35) = Only $44.9, Save $32.1 
ByteCopy($42) + Vidpie($29) = Only $54.9, Save $16.1 
ByteCopy($42) + MXF MultiMixer($45) = Only $69.9, Save $16.1 
Video Converter Ultimate($65) + Vidpie($29) = Only $74.9, Save $19.1 
Video Converter Ultimate($65) + DVD Creater($35) = Only $64.9, Save $35.1 


More 
Rip 3D Blu-rays to Plex Server for playback with 5.1 channel on TV via Raspberry Pi 
Digitize your Blu-ray/DVD movies for playing on Amazon Fire TV 
Google Nexus 7 Column - Best Solutions for Mobile Devices 
How To Install And Connect Your Galaxy Tab To A Mac Computer Using Mac Kies 
Rip the Audio Tracks from Blu-ray discs to FLAC/WAV for Media Player 
MOV To IPad: Convert MOV Files To IPad Pro On Mac 
Best way to watch MKV Blu-ray rips from PC to TV 

Src 
Play Blu-ray with multi-track MP4 on Apple Devices